Paw prints are one of the cutest and most versatile DIY designs you can create. Whether you’re making pet-themed decor, crafting gifts, decorating journals, or creating viral Pinterest content, learning how to make a paw print properly can instantly elevate your projects.
In this step-by-step guide, you’ll learn how to create a realistic and aesthetic paw print using simple materials at home. This method works for clay, paint, digital art inspiration, and even wall decor.
🧰 Materials You’ll Need
- Air-dry clay (or paper, canvas, or surface of choice)
- Acrylic paint (optional)
- Small round objects (for shaping pads)
- Toothpick or sculpting tool
- Brush (if painting)
- Glue (if attaching pieces)
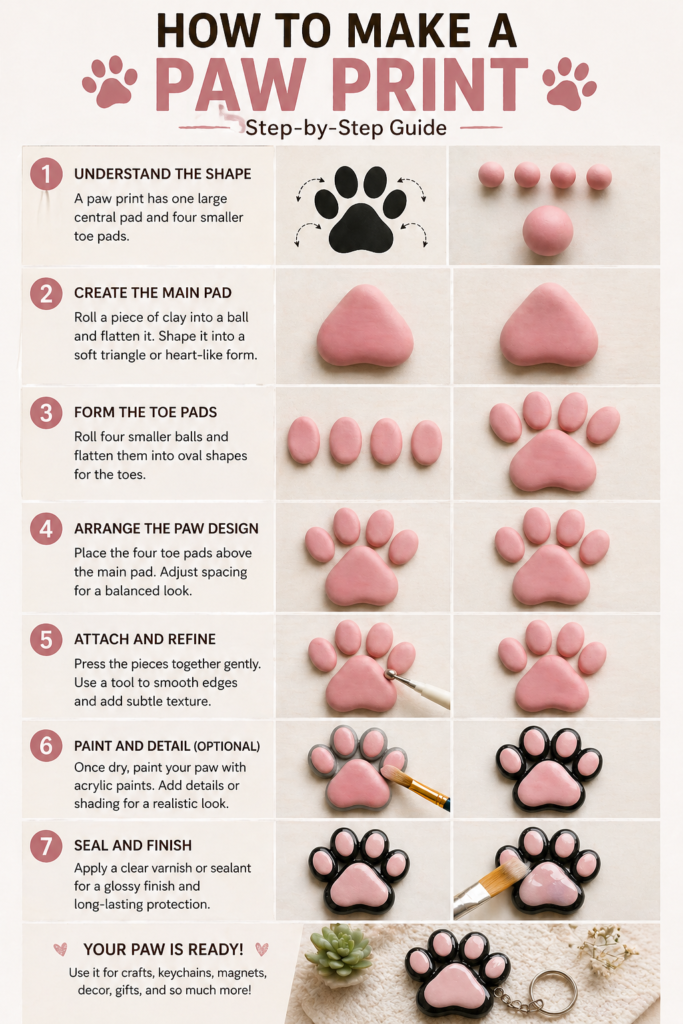
🐾 Step 1: Understand the Paw Shape
A paw print typically consists of one larger central pad and four smaller toe pads above it. The key to making it look realistic is spacing and shape — the toes should be slightly oval and not perfectly aligned.
Think of it like a rounded triangle at the bottom (main pad) and four soft oval shapes above it.
🟤 Step 2: Create the Main Pad
Start by shaping your main paw pad. Roll a small piece of clay into a ball, then gently flatten it. Shape it into a soft triangle or rounded heart-like form. This will be the base of your paw.
Keep the edges smooth and slightly curved — sharp edges will make it look unnatural.
⚪ Step 3: Form the Toe Pads
Roll four smaller balls of clay and flatten them into oval shapes. These will act as the toe pads. Place them above the main pad, leaving a small gap between each one.
Tip: The two middle toes should sit slightly higher than the outer ones for a natural look.
📐 Step 4: Arrange the Paw Design
Position the four toe pads above the main pad. Adjust spacing until it looks balanced. Avoid placing them in a straight line — a slight curve makes it more realistic.
🔗 Step 5: Attach and Refine
Press the pieces gently together if using clay, or glue them if working on another surface. Use a toothpick or sculpting tool to refine edges and add subtle texture.
🎨 Step 6: Paint and Detail (Optional)
Once dry, paint your paw print. Classic colors include:
- Black or dark brown for realistic paws
- Pastel pinks for cute aesthetic designs
- Neutral tones for modern decor
You can also add shading around the edges to give the paw more depth.
✨ Step 7: Seal and Finish
Apply a clear varnish or sealant if you want a glossy or long-lasting finish. This is especially useful for decor pieces or items that will be handled frequently.
💡 Creative Ideas Using Paw Prints
- Pet memorial frames
- Custom wall art
- Clay keychains
- Scrapbook decorations
- Pinterest-style aesthetic crafts
📌 Final Thoughts
Making a paw print is simple, but getting the proportions right makes all the difference. Once you master this basic technique, you can experiment with different sizes, colors, and textures to create unique designs.
This is one of those small crafts that performs extremely well on Pinterest because it’s cute, easy, and visually satisfying. With a little creativity, you can turn a simple paw shape into something truly eye-catching.
🖼️ Step-by-Step Visual Guide
Below is a realistic step-by-step visual showing the full process from materials to finished paw design.
