Learning how to draw the body of a woman can feel challenging at first, especially if you are trying to make the figure look natural, balanced, and expressive all at once. Many beginners get stuck because they focus on small details too early instead of building the body from simple shapes and proportions. The good news is that drawing the female figure becomes much easier when you break it down into clear steps.
The goal is not to memorize every muscle or make every sketch look perfect right away. It is to understand the basic structure of the body, how the major forms connect, and how posture changes the overall look of the figure. Once you learn that foundation, your drawings start to feel more believable and much more confident.
In this guide, you will learn how to draw the body of a woman in a simple, beginner-friendly way. We will go over proportions, body construction, posture, curves, common mistakes, and tips for making your figure drawings look softer and more natural. Whether you draw digitally or traditionally, these steps can help you improve your female anatomy sketches with less frustration.
Start with a Simple Gesture Line
Before drawing the full body, begin with a gesture line. This is a loose line that shows the main movement and flow of the pose. It helps you avoid stiff drawings and gives the figure energy from the beginning.
Think of the gesture as the backbone of the sketch. It is not about detail. It is about direction, rhythm, and balance. Even in a standing pose, the body usually has a slight curve or weight shift that makes it feel alive.
If you skip this step and jump straight into outlines, the figure can end up looking flat or rigid. A quick gesture gives the body a more natural foundation and helps you place the rest of the forms more easily.
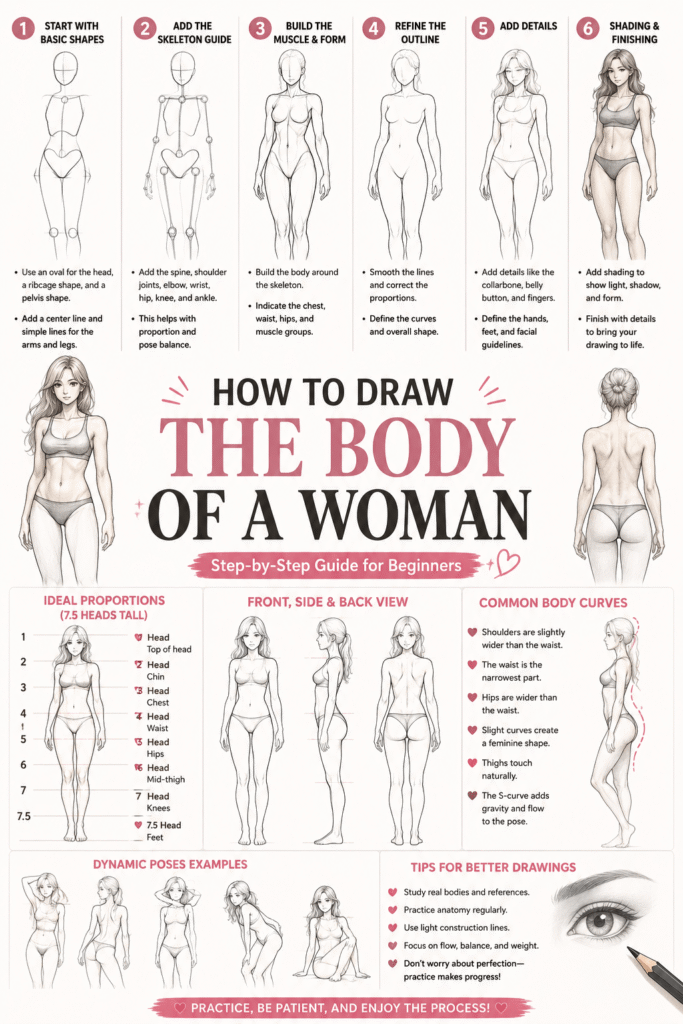
Understand Basic Female Body Proportions
One of the most helpful things you can learn is how the body is divided proportionally. A common beginner method is to measure the body in head lengths. Many adult figures are drawn around seven to eight heads tall, depending on the style. In stylized art, you can adjust this, but it helps to start with a basic proportion system first.
In many female figure drawings, the shoulders are usually a bit narrower than in many male figure drawings, while the hips are often slightly wider. The waist often curves inward more noticeably, creating a softer transition between the ribcage and pelvis. These are general tendencies, not strict rules, but they can help you recognize common structure patterns.
- The head sits at the top of the figure and sets the measurement system.
- The shoulders often fall around one and a half to two head widths across.
- The bust sits above the ribcage area, not low on the torso.
- The waist is usually the narrower part of the torso.
- The hips are often the widest point of the lower torso.
- The knees usually land around the middle of the leg length.
It helps to remember that proportions vary from person to person. Not every woman has the same body type, height, or shape. Use proportion rules as a starting structure, then adjust based on the character or reference you want to create.
Build the Torso with Simple Shapes
Instead of drawing the body as one complicated outline, break it into simple forms. A very common method is to use an egg-like shape or barrel shape for the ribcage and a tilted box or flattened bowl shape for the pelvis. These shapes make it easier to understand how the torso turns in space.
Once the ribcage and pelvis are in place, connect them with the waist. This is where the female figure often gets its elegant curve. The connection should not feel like two separate parts glued together. It should flow naturally from the upper body into the hips.
If the pose is relaxed, one side of the torso may compress while the other side stretches. This is especially noticeable in contrapposto poses where the weight rests more on one leg. Paying attention to that subtle asymmetry makes the body feel more realistic and less stiff.
Sketch the Shoulders, Hips, and Center Line
After building the torso shapes, place the shoulder line and hip line. These lines help show tilt and balance. In many natural poses, the shoulders and hips do not stay perfectly level. One side may sit higher than the other depending on how the figure is standing or moving.
Add a center line down the front of the torso as well. This helps you keep the body symmetrical and shows how the torso is angled. It is especially useful when drawing three-quarter views or poses where the body twists slightly.
These guide lines may seem simple, but they solve many proportion problems early. They help you place the chest, waist, and pelvis more accurately before you commit to final outlines.
Draw the Arms and Legs as Cylinders
Arms and legs are much easier to draw when you think of them as simple cylinders or tapered tubes instead of finished anatomy. Start with the upper arm and forearm as separate forms connected at the elbow. Do the same for the thigh and lower leg, connecting them at the knee.
In many female figure drawings, the limbs are shown with softer transitions and less exaggerated muscle definition, especially in stylized or fashion-inspired art. That does not mean the structure disappears. It just means the forms are often smoother and less angular in the final line work.
Pay attention to thickness changes. The thigh is usually fuller at the top and narrows toward the knee. The calf widens in the upper area and narrows toward the ankle. Small shape changes like these help the legs look more natural and less tube-like.
Shape the Chest, Waist, and Hips Carefully
When beginners learn how to draw the body of a woman, they often overemphasize curves too soon. It is much better to place the structure first and then shape the contours gradually. The chest, waist, and hips should feel connected to the underlying ribcage and pelvis rather than floating on top of them.
Try to think in terms of flow. The torso usually moves from the ribcage into the waist, then widens into the hips. If every curve is pushed to the extreme, the figure can start to look unnatural. Softer, controlled curves often look more elegant and believable.
Also remember that body types vary widely. Some figures have straighter silhouettes, some have fuller hips, some have athletic builds, and some have softer overall forms. Practicing different body types will make your art stronger and more versatile.
Use Hands, Feet, and Neck to Support the Figure
It is easy to focus so much on the torso that you forget the smaller supporting parts. The neck helps transition the head into the body, and its placement affects the overall grace of the pose. The hands and feet also matter because they influence gesture and balance.
For the neck, keep it connected naturally to the ribcage and shoulders rather than placing it like a stiff tube. For the hands and feet, start with simple blocky shapes or mitten-like forms before refining them. These parts do not need to be perfect in the early sketch stage.
Even a beautifully drawn torso can feel unfinished if the hands and feet are ignored. Simple structure first, detail later, is the best approach here too.
Make the Pose Feel Natural
A figure can have good proportions and still feel lifeless if the pose is too stiff. To make the body look more natural, think about weight distribution. Which leg is carrying the weight? Is the torso leaning? Are the shoulders relaxed? Is the spine straight or slightly curved?
One of the easiest ways to improve your poses is to avoid making both sides of the body do the exact same thing. Symmetry often makes drawings feel posed in an awkward way. A slight bend in one knee, a tilt of the hips, or an arm placed differently from the other can make a huge difference.
Reference photos can be very helpful here. They teach you how the body shifts and balances in real life, which is something imagination alone can make harder at first.
Common Mistakes to Avoid
- Starting with the outline instead of the gesture and body forms.
- Making the torso too short or the legs too long without meaning to.
- Drawing both shoulders and hips perfectly straight in every pose.
- Overemphasizing curves before the structure is correct.
- Ignoring the ribcage and pelvis when shaping the body.
- Making the arms and legs the same width all the way through.
- Forgetting that different body types need different proportions.
These mistakes are part of learning, so do not let them discourage you. Most figure drawing problems improve when you slow down and return to construction basics.
Practice with Simple Figure Studies
The fastest way to improve is to do short figure studies regularly. Instead of trying to create one perfect finished drawing, fill a page with quick body sketches. Focus on gesture, torso shapes, hip tilt, and leg placement. This kind of repetition builds confidence much faster.
You can also practice by drawing the same pose in different body types or art styles. Try one realistic version, one simplified version, and one stylized version. This helps you understand which details matter most and which parts can be simplified.
Over time, you will start to recognize patterns in anatomy and posture. That is when figure drawing begins to feel much less intimidating.
Final Thoughts on How to Draw the Body of a Woman
Learning how to draw the body of a woman gets easier when you stop trying to capture every detail all at once. Start with gesture, build the torso using simple shapes, place the shoulders and hips, sketch the limbs as cylinders, and refine the curves only after the structure feels solid. That process creates stronger and more natural figure drawings.
It also helps to remember that there is no single correct female body shape. Bodies vary, and your art becomes better when you explore that variety instead of repeating one formula every time. Practice different proportions, different poses, and different silhouettes as you improve.
Most of all, be patient with yourself. Figure drawing is a skill built through observation, repetition, and small corrections over time. The more you practice the basics, the more confident and expressive your drawings will become.