A granny square is one of the most classic and beginner-friendly crochet projects you can learn. It is simple, flexible, and incredibly useful because once you know how to make one square, you can turn that skill into blankets, bags, cardigans, pillow covers, coasters, and so much more. That is why so many people start here when learning crochet.
If you have ever looked at a granny square and thought it seemed confusing, you are not alone. At first, the stitches and rounds can look more complicated than they really are. The good news is that a basic granny square follows a repeatable pattern. Once you understand that pattern, the process becomes much easier and more relaxing.
In this guide, you will learn how to crochet a granny square step by step in a simple way. We will go over what supplies you need, how the basic structure works, what stitches are used, common mistakes beginners make, and how to make your square look neater. Whether you want to crochet one square or many, this tutorial will help you build confidence from the very beginning.
What Is a Granny Square?
A granny square is a small square crochet motif worked in rounds from the center outward. Most traditional granny squares are made using groups of double crochet stitches separated by chain spaces. Those chain spaces create the corners and give the square its recognizable open, airy look.
One reason granny squares are so popular is that they are easy to customize. You can make them in one color, change colors every round, keep them small, or grow them into larger squares. The basic method stays similar even when the design changes.
For beginners, the classic granny square is helpful because it teaches important crochet skills like chaining, making double crochet stitches, joining rounds, and working into spaces instead of only into individual stitches.
What You Need to Crochet a Granny Square
You do not need many supplies to get started. In fact, a simple granny square is one of the easiest crochet projects to begin with because it uses basic tools and straightforward stitches.
- Yarn in any color you like
- A crochet hook that matches your yarn weight
- Scissors
- A yarn needle for weaving in ends
If you are a beginner, using a medium-weight yarn in a lighter color can make the stitches easier to see. A hook that feels comfortable in your hand will also help you keep a better rhythm while learning.
The Basic Stitches You Need to Know
A classic granny square uses only a few beginner crochet stitches. Once you know these, the square becomes much easier to follow. Different pattern writers may use slightly different abbreviations, but the core stitches stay the same.
- Slip knot
- Chain stitch
- Slip stitch
- Double crochet
The most important stitch in a granny square is the double crochet. These are usually worked in sets of three, often called clusters, with chain stitches between them at the corners. That repeat is what builds the square shape.
How to Start a Granny Square
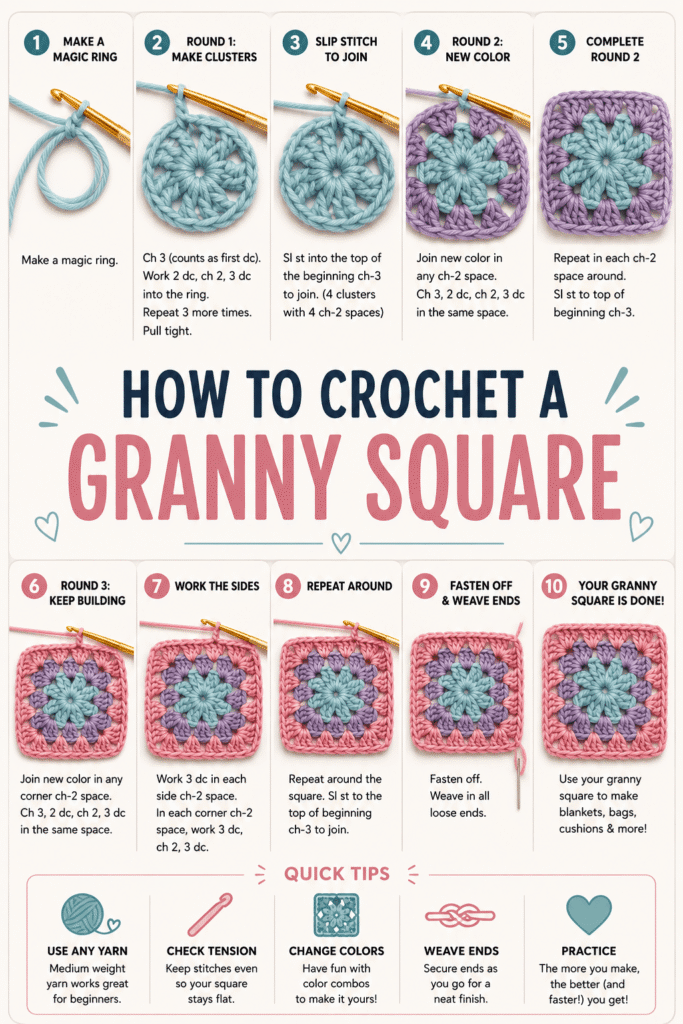
There are a few ways to begin a granny square, but one of the easiest beginner methods is to make a short chain and join it into a ring. That ring becomes the center of the square.
Start by making a slip knot on your hook. Chain four. Then insert your hook into the first chain and make a slip stitch to form a small ring. This ring is where you will work the first round.
If the ring feels tiny, that is normal. You are going to place the stitches into the center opening rather than into each chain separately. This part often feels awkward the first time, but it becomes easier very quickly.
How to Crochet the First Round
To begin round one, chain three. In many patterns, this chain three counts as your first double crochet. Then work two more double crochet stitches into the center ring. You now have your first cluster of three.
Next, chain two to make a corner space. Work three more double crochet stitches into the ring. Chain two again. Repeat this process until you have four clusters total, with chain-two spaces between each cluster.
After the fourth cluster, chain two and join the round with a slip stitch to the top of the starting chain three. At this point, your work should look like a small square with four corners. If it still looks a little loose or uneven, do not worry. That is very normal in the first round.
How to Crochet the Second Round
The second round is where the granny square starts looking more recognizable. Slip stitch across the top of the next stitches until you reach a corner space. Then chain three and work two double crochet into that same corner space. This forms your first cluster of the new round.
Chain two to create the corner, then work three more double crochet into the same corner space. This means each corner in a granny square usually holds two clusters of three double crochet, separated by a chain-two corner.
Move to the next corner space and repeat the same sequence: three double crochet, chain two, three double crochet. Continue around all four corners. Then join the round with a slip stitch to the top of the starting chain three.
How to Keep Growing the Square
Each new round follows the same general idea. You begin in a corner space, make a corner with two clusters separated by a chain two, and then work clusters into the spaces along each side. As the square gets larger, you will have more side spaces between the corners.
For each side space, work three double crochet into the space. When you reach a corner, work three double crochet, chain two, and three double crochet into that corner space. Then continue around the square.
This repeating structure is what makes granny squares feel so satisfying. After a round or two, the pattern becomes predictable and relaxing. That is one reason crochet lovers return to granny squares again and again.
Common Beginner Mistakes to Avoid
- Forgetting the chain-two corner spaces
- Adding too many or too few clusters on a side
- Joining the round in the wrong place
- Making the starting ring too tight to work into comfortably
- Pulling the yarn too tightly and making the square stiff
- Losing track of where a new round begins
If your square looks more like a circle or seems to twist, check your corners first. Most shaping issues happen because a corner chain space was skipped or the stitch count changed somewhere along the round.
Tips for a Neater Granny Square
If you want your granny square to look cleaner, focus on keeping your tension as even as possible. You do not need to crochet tightly for the square to look neat. In fact, slightly relaxed hands often create better stitch definition.
It also helps to count your clusters and corners at the end of each round. This makes it easier to catch mistakes before they grow into bigger problems. Many beginners find that their squares improve a lot just by pausing to count every round.
If your edges curl or the square feels uneven, try gently blocking it once finished. Blocking means lightly shaping the square so it lays flatter and looks more even. This is especially helpful if you plan to join multiple granny squares together later.
How to Change Colors in a Granny Square
One of the most fun things about granny squares is how easy they are to make colorful. To change colors, finish the last stitch of a round with the new color, then join and continue the next round using that yarn. This helps create a cleaner color transition.
You can change colors every round for a classic patchwork look, or stick to one shade for something more minimal. There is a lot of room to experiment, which is part of what makes granny squares so creative and enjoyable.
What to Make with Granny Squares
Once you know how to crochet a granny square, you can do much more than make single motifs. Joining multiple squares together opens up a huge range of project ideas. This is one reason learning the basic square is so useful.
- Blankets and throws
- Tote bags
- Pillow covers
- Cardigans and vests
- Scarves
- Table runners
- Wall decor
You do not need to master advanced crochet to start making beautiful things. A simple well-made granny square can go a very long way.
Final Thoughts on How to Crochet a Granny Square
Learning how to crochet a granny square is one of the best ways to begin crochet because it teaches you so many useful skills in one small project. You practice chaining, double crochet, joining rounds, counting stitches, and recognizing pattern repeats. That makes it both a beginner project and a strong building block for future crochet projects.
Do not worry if your first granny square looks a little uneven. That is part of learning. With each round, your hands will get more comfortable and the stitch pattern will start to feel more natural.
Keep practicing, count your corners, and enjoy the process. Once the pattern clicks, granny squares become relaxing, creative, and surprisingly addictive to crochet.