A paper butter squishy template is a fun and simple craft idea for anyone who loves cute paper squishies, food-themed crafts, and kawaii DIY projects. With just paper, tape, markers, scissors, and soft stuffing, you can make an adorable butter stick squishy that looks like a tiny cartoon food toy.
This craft is perfect for kids, teens, classroom activities, craft nights, handmade gifts, or anyone who enjoys making cute paper fidgets. A butter squishy is especially fun because the shape is simple, the colors are bright, and the design is easy to personalize with faces, labels, hearts, stars, and tiny food details.
You do not need a fancy printable to get started. You can draw your own paper butter squishy template by hand using basic shapes. Once you understand the simple template layout, you can make butter sticks, butter pats, butter tubs, toast-and-butter designs, popcorn butter cups, and even cute butter characters.
What Is a Paper Butter Squishy?
A paper butter squishy is a handmade paper craft shaped like butter. It is usually drawn on paper, colored, covered with clear tape, filled with soft stuffing, and sealed around the edges so it becomes puffy and gently squeezable.
Unlike foam squishies, paper squishies are lightweight and easy to make at home. They are not meant for rough squeezing, but they are fun to press gently, display, trade, or add to a handmade paper food collection.
A butter design works especially well because it can be made with simple rectangles, rounded corners, and cute wrapper details. This makes it a great beginner-friendly paper squishy project.
Supplies You Need
You only need a few basic craft supplies to make a paper butter squishy template and turn it into a finished squishy. Most of these supplies are easy to find at home or in a school craft drawer.
- White printer paper or light cardstock
- Pencil and eraser
- Black marker for outlines
- Yellow, cream, blue, pink, or pastel markers
- Clear packing tape or transparent tape
- Scissors
- Tissue, cotton, clean plastic bags, or soft paper scraps for stuffing
- Optional stickers, washi tape, glitter pens, or label details
Printer paper is easy to fold and stuff, while cardstock gives the squishy a sturdier feel. Clear packing tape helps protect the drawing and gives the butter squishy a smooth, shiny finish.
Suggested Paper Butter Squishy Template Measurements
For an easy paper butter squishy template, use a rectangle shape that is wide enough to stuff but still looks like a cute butter stick. A slightly larger template is easier for beginners because it gives you more space for the label, face, wrapper details, and tape edges.
- Classic butter stick front piece: about 6 inches wide by 3 inches tall
- Matching back piece: about 6 inches wide by 3 inches tall
- Mini butter stick: about 4 inches wide by 2 inches tall
- Large butter stick: about 8 inches wide by 4 inches tall
- Butter pat template: about 3 inches wide by 2.5 inches tall
- Butter tub template: about 5 inches wide by 3.5 inches tall
- Wrapper label area: about 3.5 inches wide by 1.25 inches tall
- Tape edge allowance: leave about 1/4 inch around the outside edge
If you want a puffy paper squishy, make sure the front and back pieces are the same size. Tape around the edges slowly, leave a small opening, add stuffing little by little, and seal the final opening once the butter squishy feels soft but not too tight.
For a folded butter box style, add side tabs that are about 1/2 inch wide. These tabs give you extra space to fold and seal the template neatly, especially if you want the butter craft to look more like a tiny package.
Basic Paper Butter Squishy Template Shape
The easiest paper butter squishy template starts with a long rounded rectangle. This shape becomes the front of the butter stick. Draw a matching back piece that is the same size, or fold your paper and cut both pieces at once.
For a simple butter stick template, draw a rectangle about the size of a small candy bar. Round the corners slightly so it is easier to tape. Add a smaller rectangle inside to look like a wrapper label.
On the front, write a short label such as “Butter,” “Sweet Butter,” or “Kawaii Butter.” Keep the words large and simple so they are easy to read after taping and stuffing.
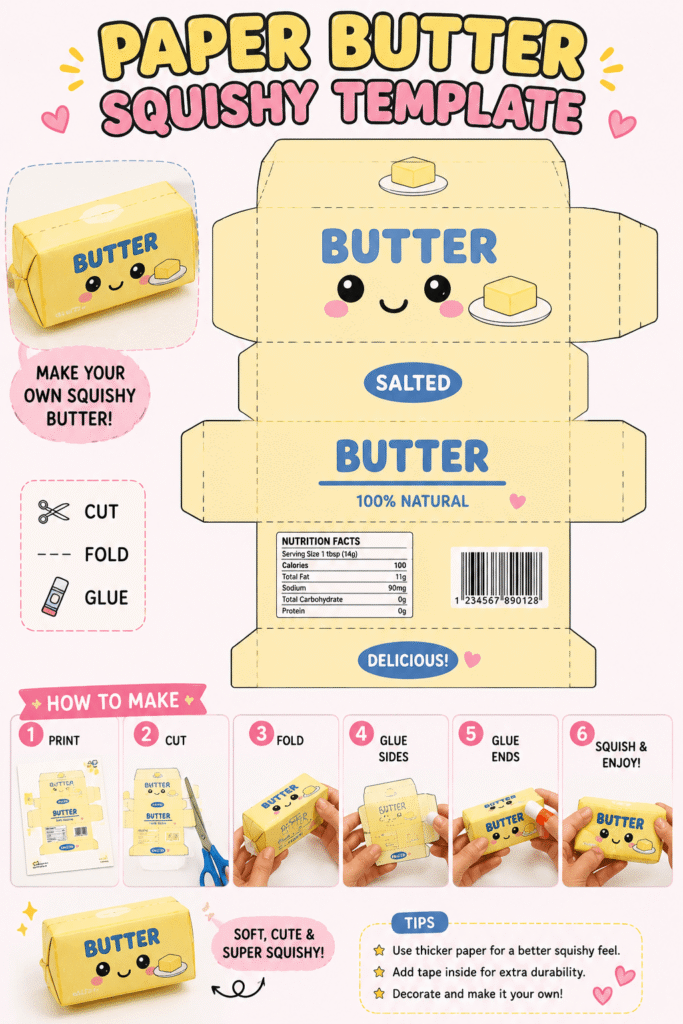
How to Make a Paper Butter Squishy
Start by sketching your butter shape in pencil. Keep the outline simple and rounded. Add wrapper lines, a label, little shine marks, a cute face, and small decorations like hearts or stars.
Next, color the butter. Use soft yellow or creamy yellow for the butter area, then choose a wrapper color like pastel blue, pink, white, or light green. Outline everything with a black marker so the design stands out.
Cover the front and back pieces with clear tape before cutting them out. This helps protect the color and makes the finished paper squishy smoother.
Cut out both pieces, then tape the edges together carefully. Leave a small opening on one side. Add stuffing slowly until the butter squishy feels soft and slightly puffy. Seal the opening with tape and gently squeeze to test it.
1. Classic Butter Stick Template
The classic butter stick is the easiest design to make. Draw a long rectangle with rounded corners, a yellow butter center, and a simple paper wrapper around the edges.
Add a cute face in the middle and write “Butter” on the label. Use little shine marks to make the butter look smooth and glossy.
This is the best beginner template because it is easy to draw, cut, stuff, and seal.
2. Kawaii Butter Pat Template
A butter pat is a small square or rounded rectangle shape. It looks like a tiny slice of butter you might see on pancakes, toast, or waffles.
Draw a soft yellow square with rounded edges and add a happy face. You can include tiny arms, blush, or sparkles for extra cuteness.
This mini template is great if you want to make several small squishies quickly.
3. Butter Tub Paper Squishy
A butter tub design is a little different because it looks like a small container. Draw a wide oval or rounded rectangle with a lid, label, and creamy yellow color inside.
Add a short label like “Butter Tub” or “Soft Butter.” Keep the design simple so it stays readable after you tape it.
This template is fun for anyone who wants a squishy that looks like a grocery store food item.
4. Toast With Butter Squishy
A toast and butter squishy combines two cute food shapes in one. Draw a slice of toast with a small square of butter melting on top.
Use tan and golden brown colors for the toast, then bright yellow for the butter. Add a smiling face to the toast or butter pat.
This design looks adorable in a paper breakfast food collection with eggs, pancakes, milk cartons, and jam jars.
5. Pancake Butter Topper Squishy
A pancake butter squishy is cozy and cute. Draw a stack of pancakes with a little butter square on top and syrup dripping down the sides.
Use warm browns, golden yellows, and amber syrup colors. Add a tiny face to the top pancake or the butter square.
This design is slightly more detailed, but it makes a very cute finished squishy for food craft lovers.
6. Popcorn Butter Cup Squishy
A popcorn butter cup is a playful movie-night craft idea. Draw a striped popcorn box with a butter label and fluffy popcorn pieces at the top.
Use yellow details to show buttery popcorn. Add a smiling face to the box or one of the popcorn pieces.
This template is perfect for pairing with candy, soda cup, and movie snack paper squishies.
7. Butter Box Template
A butter box paper squishy looks like a small packaged food box. Draw a rectangle with side flap lines, a label, and a butter stick illustration on the front.
Use pastel colors for the packaging and yellow accents for the butter. You can add tiny text like “Fresh” or “Creamy,” but keep it short.
This template works well if you enjoy grocery-style paper squishies and mini food packaging crafts.
8. Melting Butter Character
A melting butter character is cute and silly. Draw a butter cube with drippy edges, a happy face, and small arms.
The drips make the shape more playful, but keep them rounded so they are easy to cut and tape. Use a black outline to make the melted edges stand out.
This idea is great if you want your paper butter squishy to feel more like a character than a food package.
9. Mini Butter Label Template
A mini butter label template is a simple rectangle with a large word in the center. This is perfect for adding a wrapper-style look to your squishy.
Draw a yellow center and a pastel border, then write “Butter” in bold letters. Add tiny hearts, dots, or stars around the label.
You can use this idea on a butter stick, butter box, or butter tub design to make the craft look more finished.
10. Printable-Style Butter Cutout Sheet
A printable-style cutout sheet is useful if you want to make several butter squishies at once. Draw multiple butter shapes on one page, such as a stick, pat, tub, and melting cube.
Color each design differently, then cut and stuff them one at a time. This gives you a full butter-themed squishy collection from one sheet of paper.
This idea is perfect for parties, classroom crafts, or craft days where everyone wants to choose a different template.
Tips for Making Your Butter Squishy Look Cute
The cutest paper butter squishies usually have simple shapes, bold outlines, and cheerful colors. Do not worry about making the design perfect. A handmade look often makes the squishy more charming.
- Use rounded corners so the edges are easier to tape
- Keep labels short and large
- Add blush, sparkles, hearts, or tiny arms for a kawaii look
- Choose yellow, cream, pastel blue, pink, or white colors
- Cover the drawing with tape before cutting
- Add stuffing slowly so the paper does not burst
- Seal all edges carefully with clear tape
Common Mistakes to Avoid
One common mistake is making the template too narrow. Thin shapes are harder to stuff and can tear more easily. A slightly wider butter stick will be easier to make and more satisfying to squeeze.
Another mistake is overstuffing. Paper squishies should feel soft and puffy, not packed tightly. Too much stuffing can make the tape pull apart.
- Do not use wet glue inside the squishy
- Do not cut too close to the drawing before sealing
- Do not add tiny words that are hard to read
- Do not skip the clear tape layer
- Do not squeeze too hard after finishing
Fun Ways to Use Your Paper Butter Squishy
Once your butter squishy is finished, you can display it on your desk, add it to a paper food collection, trade it with friends, or tuck it into a handmade gift bag. It also looks cute in a pretend breakfast shop or mini grocery store display.
You can make matching paper squishies like toast, pancakes, waffles, eggs, jam, milk, and orange juice. Together, they create a full breakfast-themed craft collection.
If you want to make your butter squishy extra special, create a tiny paper wrapper, a mini tray, or a small breakfast menu to go with it.
Final Thoughts on Paper Butter Squishy Templates
A paper butter squishy template is one of the cutest and easiest food paper crafts to try. The simple shape makes it beginner-friendly, while the label, wrapper, and kawaii face details make it fun to decorate.
You can start with a classic butter stick, then try butter pats, butter tubs, toast with butter, pancake toppers, popcorn butter cups, butter boxes, melting butter characters, mini labels, and printable-style cutout sheets.
With paper, tape, markers, and stuffing, you can create a whole collection of soft, cheerful, butter-themed paper squishies. Keep your shapes simple, your colors bright, and your details playful for the cutest finished craft.