Origami claws are one of the most fun and beginner-friendly paper crafts you can make. Whether you’re creating them for cosplay, a fun DIY project, Halloween props, or just something cool to show off, origami claws are simple, fast, and incredibly satisfying to make.
In this easy step-by-step tutorial, you’ll learn how to fold a realistic-looking origami claw using just a piece of paper. No glue, no cutting—just clean folds and a little patience.
🧰 Materials You’ll Need
- 1 sheet of paper (A4 or square paper works best)
- Flat surface for folding
- Your hands (that’s it!)
📄 Step 1: Start with a Square or Rectangular Paper
Begin with a standard sheet of paper. If you’re using A4 or letter-sized paper, you can still follow along easily. Place the paper flat in front of you on a table.
For best results, use slightly thicker paper so your claw holds its shape better.
📐 Step 2: Fold Diagonally into a Triangle
Take one corner of the paper and fold it diagonally to the opposite side, forming a large triangle. Make sure the edges line up neatly and press down firmly to create a sharp crease.
🔺 Step 3: Fold into a Smaller Triangle
Fold the triangle again in half to make a smaller triangle. This helps create the base structure of your claw.
📏 Step 4: Create the Claw Shape
Take one side of the triangle and fold it across toward the opposite side, forming a skewed shape. Then fold the other side over it. This creates a layered structure that will form the claw.
You should now have a shape that looks like a folded cone or layered triangle.
🌀 Step 5: Fold the Flap Around
Take the remaining flap and wrap it around the structure. Tuck it into the pocket created by the folds to lock everything in place.
This step secures your claw so it doesn’t fall apart.
🖐️ Step 6: Adjust the Opening
Gently open the bottom of the claw where your finger will go. Adjust it so it fits comfortably on your finger.
✨ Step 7: Shape the Tip
Pinch and slightly curve the tip of the claw to give it a sharper, more realistic look. You can also bend it slightly for a dramatic effect.
💡 Tips for Better Origami Claws
- Use thicker paper for stronger claws
- Make multiple claws for all fingers
- Use colored or patterned paper for a cool effect
- Try metallic or black paper for a dramatic look
🎨 Creative Ideas
- Make a full set of claws for cosplay
- Create themed claws (dragon, vampire, eagle)
- Use them for Halloween costumes
- Turn it into a fun kids’ craft activity
📌 Final Thoughts
Origami claws are one of those crafts that are simple to learn but look incredibly impressive when done right. With just a few folds, you can turn a plain sheet of paper into something sharp, stylish, and fun.
This is also a highly shareable and viral-friendly craft—perfect for Pinterest, TikTok, and DIY blogs. Once you master one, you’ll probably want to make a whole set!
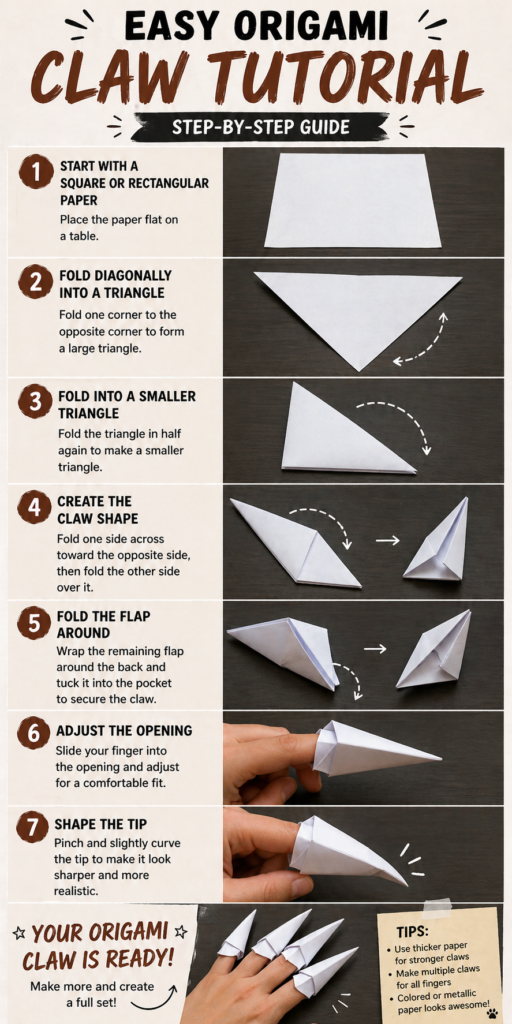
🖼️ Step-by-Step Visual Guide
Below is a realistic vertical step-by-step infographic showing exactly how to fold an origami claw from start to finish.
