French braids look polished, pretty, and surprisingly versatile, which is why they stay popular year after year. They can be worn for school, work, workouts, casual days, weddings, and everything in between. Even though they may seem complicated at first, French braids become much easier once you understand the pattern behind them.
The biggest reason beginners struggle with French braids is not because the braid is too hard. It is usually because their hands are trying to learn a new rhythm. Once you understand where each section goes and how to add hair evenly, the process starts to feel much more natural.
This guide breaks everything down in a simple way so you can learn how to do French braids step by step. You will learn what a French braid is, how to prepare your hair, how to braid cleanly, common mistakes to avoid, and tips that make the style look smoother and last longer. Whether you are braiding your own hair or practicing on someone else, this tutorial will help you feel more confident.
What Is a French Braid?
A French braid is a three-strand braid that gradually adds more hair from the sides as you move down the head. Instead of braiding all the hair from the beginning, you start with a small section near the top and keep feeding in new pieces as you go. That is what creates the classic woven look that sits close to the scalp.
Unlike a basic three-strand braid, a French braid stays connected to the head along the way. This gives it a neater, more structured appearance. It also makes it practical because it can hold the hair securely and keep it out of your face.
Once you learn the foundation, you can create many variations, including double French braids, side French braids, loose romantic braids, and braided updos. Mastering one basic French braid opens the door to many hairstyles.
What You Need Before You Start
You do not need a long list of tools, but having a few basics nearby can make the process much easier. Hair that is slightly textured or not freshly washed can also be simpler to braid because it grips better than super silky hair.
- A brush or wide-tooth comb
- A mirror, or two mirrors if braiding your own hair
- Hair elastics
- Clips for sectioning if needed
- Light texturizing spray or dry shampoo for grip
- Hairspray or smoothing cream for flyaways
If your hair is very smooth or layered, a little texture spray can help a lot. It gives the strands more hold so they do not slip out of your hands as easily. That one step can make learning much less frustrating.
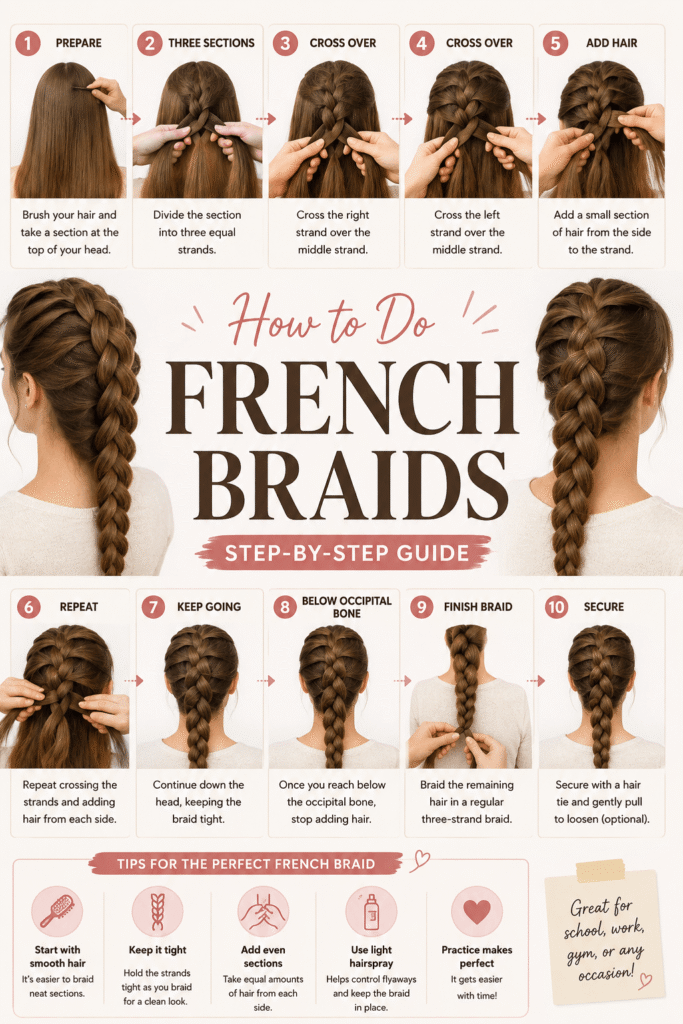
How to Prep Hair for a French Braid
Start by brushing through the hair carefully so there are no tangles. Knots can make the braid uneven and difficult to control, especially when you are adding side sections. Smooth hair is much easier to section and braid neatly.
Next, decide how polished or relaxed you want the final style to look. For a cleaner braid, keep the hair smooth and use a center or side part if desired. For a softer braid, you can leave a little natural texture and loosen the finished style later.
If you are braiding your own hair, it helps to begin in front of a mirror with good lighting. Some beginners find it easier to practice on someone else first because you can see the pattern more clearly. Still, with repetition, self-braiding becomes much easier too.
How to Do a Basic French Braid Step by Step
1. Start with a section at the crown
Take a section of hair from the top front part of the head, near the crown or hairline depending on where you want the braid to begin. Divide this section into three equal strands. Hold one in the left hand, one in the right hand, and one in the center.
2. Begin a regular braid
Cross the right strand over the center strand. Then cross the left strand over the new center strand. At this point, you are simply starting a normal three-strand braid. This creates the base for the French braid.
3. Add hair to the right side
Before crossing the right strand over again, gather a small section of loose hair from the right side of the head and combine it with the right strand. Then cross that fuller section over the center. Try to keep the added section smooth and similar in size to the sections you will add later.
4. Add hair to the left side
Now do the same thing on the left. Pick up a small section of loose hair from the left side and add it to the left strand. Then cross it over the center. This left-right rhythm is the heart of the French braid.
5. Repeat the pattern down the head
Continue adding hair to each side before crossing that strand over the center. Right side adds hair and crosses over, then left side adds hair and crosses over. Keep repeating this pattern while working down the back of the head.
Try to keep your tension consistent. Pulling too tightly in one area and too loosely in another can make the braid look uneven. Firm but gentle tension usually gives the cleanest result.
6. Finish with a regular braid
Once there is no more loose hair left to add, continue with a regular three-strand braid using the remaining length. Braid to the ends and secure it with a small elastic.
7. Adjust the final look
You can leave the braid sleek and tight for a sportier or more polished finish. Or you can gently pull on the outer edges of the braid to make it look fuller and softer. This step is often called pancaking, and it can make the braid appear more relaxed and voluminous.
How to French Braid Your Own Hair More Easily
Doing a French braid on yourself is usually harder than braiding someone else because your arms get tired and you cannot easily see the back. That is completely normal. The trick is to move slowly and focus on the pattern instead of speed.
Keep your hands close to the head while braiding so the sections stay controlled. Use your fingers to separate strands neatly before crossing them. If one side feels thicker than the other, pause and rebalance before continuing.
It also helps to practice without worrying about perfection. Your first few attempts may feel messy, but each try teaches your fingers where the strands go. Muscle memory matters a lot with French braids.
Common French Braid Mistakes to Avoid
- Starting with tangled hair
- Taking sections that are too large or too uneven
- Adding hair from only one side cleanly while the other side gets messy
- Letting the braid drift off-center
- Pulling too tight and causing discomfort
- Holding the strands too loosely so the braid falls apart
- Trying to braid too fast before learning the pattern
These mistakes are common, especially when you are new to braiding. The good news is that they improve quickly with practice. A neat sectioning pattern and steady hand placement make the biggest difference.
Tips for Making French Braids Look Better
If you want your braid to look smoother, focus on taking even sections from both sides. Small, balanced additions usually create the cleanest braid pattern. When the added pieces are similar in size, the braid looks more polished and intentional.
For more volume, gently loosen the braid after securing it. Pull softly at the edges instead of tugging randomly. This helps the braid widen evenly and gives it that fuller Pinterest-worthy look without ruining the shape.
If flyaways are a problem, use a tiny bit of smoothing cream or hairspray on your fingertips. Lightly press down frizz rather than soaking the hair. A little product goes a long way.
French Braid Variations to Try Next
Once you are comfortable with one braid, there are several easy ways to switch up the style. Double French braids are one of the most popular options and work especially well for active days or casual looks. Side French braids are softer and more romantic.
You can also combine a French braid with a ponytail, bun, or half-up hairstyle. These variations are great when you want the braid detail without braiding all the way down. Learning the basic technique first makes all of these much easier.
- Double French braids
- Side French braid
- Half-up French braid
- French braid into a bun
- Loose boho French braid
How to Make Your French Braid Last Longer
To help your braid stay secure all day, begin with hair that has a little grip. Very silky freshly washed hair can still be braided, but a touch of texture spray often helps the style hold better. Secure the ends well and pin any loose spots if needed.
If you are wearing the braid for several hours, finish with a light mist of hairspray. You can also tuck in shorter layers with bobby pins if they tend to slip out. At night, sleeping on a silk pillowcase or wrapping the braid lightly can help reduce frizz.
Final Thoughts on How to Do French Braids
Learning how to do French braids takes practice, but it is absolutely a skill most people can build. The key is understanding the pattern: start with three strands, add hair from each side before crossing over the center, and repeat all the way down. Once that rhythm clicks, the braid becomes much less intimidating.
Do not worry if your first attempts are loose, uneven, or messy. Every braid helps train your hands, and progress often happens faster than expected. With a little patience, you can go from beginner to confident braider and create styles that look both practical and beautiful.
Keep practicing, experiment with tension and section sizes, and try different braid variations once the basic method feels easier. French braids are one of those hairstyles that get better the more you do them, and the results are worth it.