Learning how to draw a flower is one of the easiest and most enjoyable ways to start practicing art. Flowers are beautiful, flexible, and forgiving subjects because they come in so many shapes, sizes, and styles. A flower drawing can be simple and minimal, soft and romantic, bold and colorful, or detailed and realistic.
If you are a beginner, the best way to draw a flower is to break it down into basic shapes. Most flowers can start with a circle, oval, teardrop, cup shape, or simple center point. Once the main shape is in place, you can add petals, a stem, leaves, texture, shading, and color.
This guide will walk you through how to draw a flower step by step, plus give you extra ideas for drawing roses, daisies, tulips, sunflowers, lilies, and simple floral doodles. You can use these tips for sketchbooks, bullet journals, handmade cards, wall art, coloring pages, stickers, and creative projects.
Basic Supplies You Need
You do not need expensive art supplies to learn how to draw a flower. Start simple and add more tools as you become more comfortable.
- A pencil for light sketching
- An eraser for adjusting shapes
- Drawing paper or a sketchbook
- A fine liner pen for clean outlines
- Colored pencils, markers, or watercolor if you want color
- A blending stump or tissue for soft shading
A regular pencil and paper are enough for your first flower drawing. Focus on understanding the shape before worrying about perfect details.
Start with Simple Flower Shapes
The easiest way to draw a flower is to look for the basic shapes inside it. A daisy begins with a circle and long oval petals. A tulip begins with a cup shape. A rose begins with a small spiral and layered curved petals.
When you see flowers as shapes, they become much easier to draw. Instead of trying to copy every detail at once, you build the flower slowly.
- Use circles for flower centers.
- Use ovals for simple petals.
- Use curved lines for stems.
- Use teardrop shapes for leaves.
- Use light lines first so you can erase easily.
This shape-first method works for almost every flower. It also helps your drawing look more balanced and natural.
Step 1: Draw the Flower Center
Begin by drawing a small circle or oval near the center of your page. This will be the middle of the flower. Keep your lines light so you can adjust them later.
For a daisy or sunflower, the center can be a round circle. For a rose, the center can be a tiny spiral. For a tulip or lily, the center may be hidden inside the petals, so you may start with the overall cup shape instead.
The flower center helps guide the rest of your drawing. Once it is placed, you can build petals evenly around it.
Step 2: Add the First Petals
Next, draw a few petals around the center. Start with simple oval or teardrop shapes. Do not worry about making them perfectly even. Real flowers are naturally irregular.
For a beginner flower, try drawing five to eight petals around the center. Let each petal touch the center and extend outward. The petals can be rounded, pointed, long, short, wide, or narrow depending on the flower you want to draw.
If you are drawing a daisy, keep the petals long and simple. If you are drawing a rose, use curved overlapping petals. If you are drawing a sunflower, make the petals longer and slightly pointed.
Step 3: Build More Petal Layers
Once the first petals are in place, add another layer behind them. This makes the flower look fuller and more realistic.
Place the second layer of petals between the first ones, so they peek out from behind. This creates depth and movement. Some petals can be slightly larger, smaller, curved, or folded.
Layering is what makes a flower drawing feel alive. Even a simple flower can look beautiful when the petals overlap naturally.
Step 4: Draw the Stem
After the flower head is complete, draw a stem coming down from the bottom of the flower. Use two slightly curved lines instead of one straight line. This makes the stem look more natural.
The stem can be long, short, thin, or slightly thick depending on the style of flower. A tulip has a smooth upright stem. A wildflower may have a thinner, curved stem. A sunflower often has a stronger, thicker stem.
Try not to make the stem too stiff. A gentle curve can make the whole drawing feel softer and more organic.
Step 5: Add Leaves
Leaves help complete the flower drawing. Add one or two leaves along the stem using teardrop or pointed oval shapes.
Draw a curved line down the center of each leaf, then add smaller lines branching out to create veins. Keep the details simple at first. You can always add more texture later.
Leaves do not need to match perfectly. One leaf can be larger than the other, or one can point upward while the other curves downward. Natural variation makes the drawing more interesting.
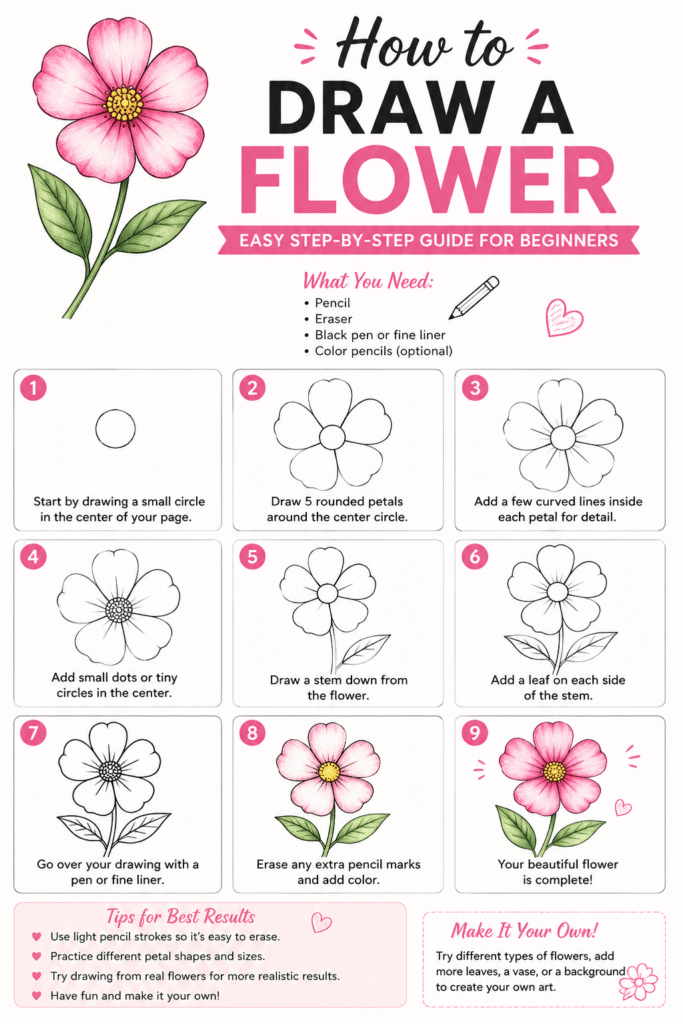
Step 6: Add Petal Details
Now that the main flower shape is complete, add details inside the petals. Use light curved lines to show folds, texture, and direction.
Petal lines should follow the shape of the petal. If the petal curves outward, the detail lines should curve too. Avoid drawing too many lines or the flower may look messy.
A few well-placed lines can make the flower look more delicate and realistic. This is especially helpful for roses, lilies, tulips, and hibiscus flowers.
Step 7: Add Shading
Shading gives your flower drawing depth. Look for areas where petals overlap, where the center is darker, and where the leaves bend.
Shade lightly at first. Add darker pencil marks near the base of petals, under overlapping petals, and along the center of leaves. Blend gently if you want a softer look.
You do not need perfect shading to make a flower look good. Even simple shadows can help the drawing feel more finished.
Step 8: Outline the Flower
If you want a clean drawing, go over your final pencil lines with a fine liner pen. Let the ink dry, then erase any leftover pencil marks.
You can use thin lines for a delicate look or slightly thicker lines for a bold illustration style. Varying the line thickness can make the drawing more interesting.
If you prefer a soft pencil sketch, you can skip the ink and keep the drawing in graphite. Both styles can look beautiful.
Step 9: Add Color
Color is optional, but it can bring your flower drawing to life. Use colored pencils, markers, watercolor, or digital brushes.
Choose colors based on the flower you are drawing. Roses can be red, pink, white, yellow, or peach. Tulips can be pink, purple, red, or orange. Daisies often have white petals and yellow centers. Sunflowers usually have golden petals and brown centers.
Start with a light layer of color, then build darker tones slowly. This gives the flower a soft and natural look.
Step 10: Practice Different Flower Types
Once you learn the basic steps, try drawing different flowers. Each flower will teach you something new about shape, line, and texture.
- Draw a daisy for simple petals.
- Draw a rose for layered petals.
- Draw a tulip for smooth curved shapes.
- Draw a sunflower for bold centers and pointed petals.
- Draw lavender for tiny repeated buds.
- Draw a hibiscus for tropical petal shapes.
The more flowers you draw, the easier it becomes to understand how petals, stems, and leaves work together.
Easy Flower Drawing Ideas for Beginners
If you want a very simple flower drawing, start with a daisy. Draw a circle, add petals, draw a stem, and add two leaves. This is the classic beginner flower because it uses basic shapes and does not require complicated layers.
Another easy idea is a tulip. Draw a cup shape, add a few petal lines at the top, then draw a stem and two long leaves. Tulips look elegant even when they are drawn simply.
- Simple daisy outline
- Minimal tulip drawing
- Small wildflower doodle
- Lavender stem
- Easy rose spiral
- Sunflower with basic petals
Beginner flower drawings do not need to be detailed. Clean shapes and confident lines can make a simple sketch look lovely.
How to Draw a Rose
To draw a rose, start with a small spiral in the center. Add curved petals around the spiral, making each layer slightly larger. Let the petals overlap and curl in different directions.
Roses look more realistic when the petals are not all the same size. Some petals can be narrow, some can be wide, and some can fold over at the edges.
Add shading under the overlapping petals to create depth. A rose can look beautiful as a pencil sketch, ink drawing, or soft colored pencil artwork.
How to Draw a Daisy
To draw a daisy, start with a round center. Add long oval petals all the way around the circle. Keep the petals simple and evenly spaced.
Draw a thin stem and two small leaves. Add tiny dots or texture inside the center to make it more interesting.
Daisies are perfect for beginners because they are cheerful, simple, and easy to repeat in patterns or borders.
How to Draw a Tulip
To draw a tulip, begin with a rounded cup shape. Add curved lines at the top to show where the petals overlap. Then draw a smooth stem and long leaves.
Tulip leaves are usually wide and curved, so use flowing lines rather than sharp shapes. Add light shading near the base of the petals for depth.
Tulips are great for spring art, cards, journal pages, and elegant floral sketches.
Tips for Better Flower Drawings
Flower drawing improves with practice. The more you observe real flowers, the easier it becomes to draw them naturally.
- Use reference photos when you need help.
- Draw lightly before adding final lines.
- Notice how petals overlap.
- Keep leaves and stems slightly curved.
- Practice one flower several times.
- Do not erase every imperfect line.
Every drawing teaches you something. Even sketches you do not love can help you improve.
Final Thoughts on How to Draw a Flower
Learning how to draw a flower is a relaxing and rewarding art practice. By starting with simple shapes, adding petals in layers, drawing stems and leaves, and finishing with details, shading, or color, you can create a beautiful floral drawing step by step.
Start with easy flowers like daisies, tulips, and lavender. Then try more detailed flowers like roses, lilies, peonies, orchids, and hibiscus as your confidence grows.
The most important part is to keep practicing. Flowers do not have to be perfect to be beautiful. With each sketch, your lines will become smoother, your shapes will feel more natural, and your flower drawings will become more expressive.