Anime eyes are one of the most expressive parts of anime and manga art. They can make a character look sweet, serious, dramatic, playful, mysterious, or powerful with just a few small changes in shape and detail. That is why so many beginners want to learn them first. Once you understand the basic structure, drawing anime eyes becomes much easier and a lot more fun.
If anime eyes feel tricky right now, do not worry. Most artists struggle in the beginning because they focus too much on copying the final look instead of learning the simple shapes underneath. The good news is that anime eyes are built from a few repeatable parts: the upper lash line, iris, pupil, highlights, lower lid, and eyebrows. When you break them down step by step, they start to make sense.
In this guide, you will learn how to draw anime eyes in a simple, beginner-friendly way. We will go over the basic structure, common mistakes, helpful drawing tips, and easy ways to create different emotions and styles. Whether you want to draw cute eyes, sharp eyes, or soft dreamy eyes, this guide will help you build confidence with every sketch.
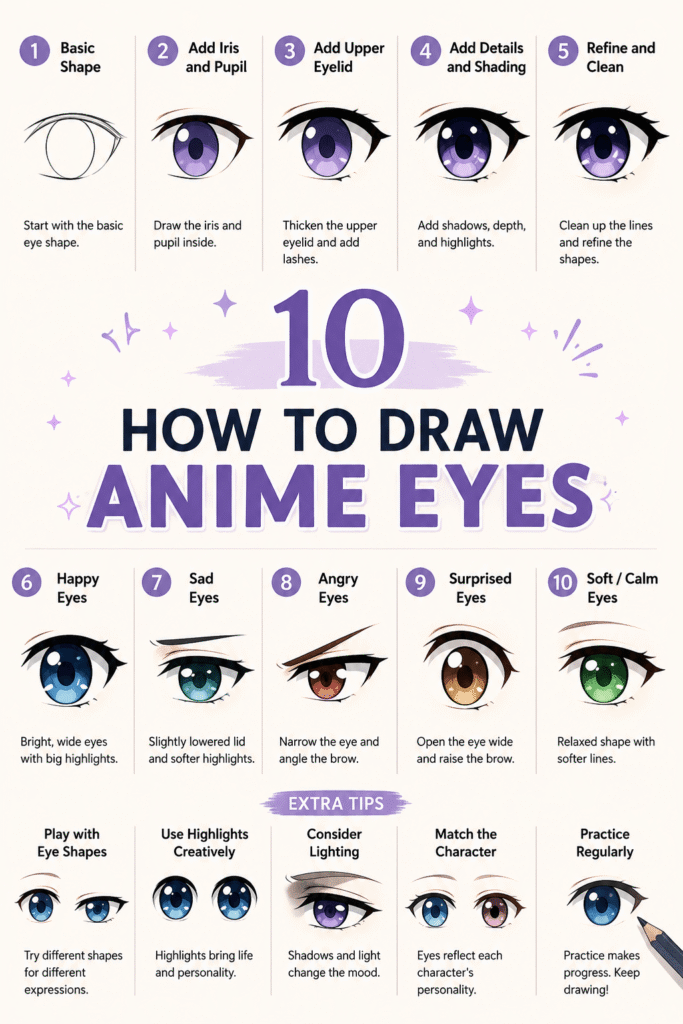
Start with the Basic Eye Shape
The first step is drawing the basic shape of the eye. In anime, the upper eyelid is usually more defined than the lower eyelid. Instead of drawing a full realistic almond shape, begin with a slightly curved top line and a softer, lighter bottom line. This instantly gives the eye a stylized anime look.
Think of the upper line as the part that carries the most visual weight. It often appears thicker because it includes eyelashes or a darker lid line. The bottom line is usually lighter and simpler. Keeping this contrast helps the eye look clean instead of overly detailed.
Simple shape tips for beginners
- Use a curved line for the top lash line.
- Keep the lower lid shorter and lighter.
- Make the inner and outer corners soft at first.
- Avoid pressing too hard until the shape feels right.
Draw a Large Iris for That Classic Anime Look
One of the easiest ways to make an eye look more anime-inspired is to draw a larger iris. In many anime styles, the iris takes up a big part of the visible eye area. This is especially common in cute, youthful, or emotional characters.
Place the iris so it tucks slightly under the upper eyelid. This helps the eye feel natural and less surprised. A floating circle in the middle can make the expression look stiff, so letting the iris overlap with the top lid usually works better.
You can also change the mood by adjusting the iris size. Bigger irises often feel innocent or gentle, while smaller irises can look more mature, serious, or intense. This one choice can completely change the character vibe.
Add the Pupil and Highlights
Once the iris is in place, add the pupil. In anime art, the pupil can be round, oval, or even softly blended into the iris depending on the style. Keep it centered unless you want the character to look in a specific direction.
Then add highlights. Highlights are one of the features that make anime eyes feel lively and glossy. Most artists add one large highlight and one smaller highlight, usually on the same side of the eye. Leave these areas white or lighter than the rest of the iris.
These bright shapes create sparkle and emotion. Even a very simple eye can suddenly look polished once the highlights are added. If your eyes ever feel flat, the highlight placement is a great place to improve them.
Thicken the Upper Lash Line
The upper lash line is a major style element in anime eyes. By thickening this line, you create contrast and make the eye more readable, even from far away. This is one reason anime character expressions feel so bold and memorable.
You do not need to draw realistic individual lashes unless that is part of your style. A thicker upper line often does enough on its own. For feminine or glamorous designs, you can add a few lash points on the outer edge. For masculine or simple styles, keep it cleaner and straighter.
Try varying the thickness from one end to the other. A slightly thicker outer corner can make the eye feel softer or more elegant. Little line-weight changes like this can improve your drawings fast.
Use the Eyebrow to Control Expression
Many beginners focus only on the eye itself, but the eyebrow does a huge amount of emotional work. A relaxed eyebrow gives a calm expression. A raised eyebrow can make the character look curious or surprised. Angled brows can create determination, anger, or focus.
Keep some space between the eyebrow and the eye so the face does not feel crowded. Then experiment with the tilt and curve. Even if the eye shape stays mostly the same, changing the eyebrow can completely shift the mood.
If you want more expressive characters, practice drawing the same eye with five different eyebrow positions. It is one of the fastest ways to understand facial emotion in anime art.
Learn the Most Common Anime Eye Styles
There is not just one way to draw anime eyes. Different character types often use different shapes and details. Learning a few core styles will give you more flexibility when designing characters.
Cute anime eyes
Cute eyes are usually rounder, larger, and filled with bigger highlights. The lashes are soft, and the expression feels open and friendly. This style works well for cheerful, kind, or younger characters.
Sharp anime eyes
Sharp eyes are narrower and more angled. The upper lid may slant downward toward the center or rise sharply at the outer corner. This style is often used for cool, serious, intelligent, or intense characters.
Sleepy or relaxed eyes
These eyes have heavier lids and less open space. The iris may be partially covered, and the brow sits in a flatter position. This style can make a character seem calm, bored, mature, or mysterious.
Shiny detailed eyes
This style uses extra reflections, gradient-like shading, and layered shapes inside the iris. It is common in romance, fantasy, and magical-girl inspired artwork. It takes more time, but it creates a very polished look.
Make Both Eyes Match
One of the biggest struggles when learning how to draw anime eyes is keeping both eyes symmetrical. It is normal for one eye to look slightly different from the other, especially when you are still building control. The key is to compare constantly instead of finishing one eye completely before starting the second.
Lightly sketch both eye shapes first. Then check the angle, width, and spacing before adding details. A helpful rule is that the space between the eyes is often about the width of one eye, though stylized art can bend this rule.
Flipping your canvas digitally or looking at your paper in a mirror can also help you spot uneven shapes quickly. Small corrections early save a lot of frustration later.
Shade the Eyes for More Depth
Shading can make anime eyes look more dimensional without making them realistic. A common technique is to keep the top part of the iris darker and the lower part lighter. This mimics the shadow cast by the upper lid and adds depth.
You can also add a soft shadow right under the upper lash line. This makes the eye feel more connected and less flat. If you work traditionally, colored pencils, alcohol markers, or soft graphite blending can all create beautiful results.
Keep your shading simple at first. Clean values usually look better than overworked details, especially in stylized art.
Common Mistakes to Avoid
- Drawing the lower lash line too dark and heavy.
- Placing the iris in the exact center without overlap from the top lid.
- Making one eye taller or wider than the other.
- Adding too many tiny details before the base shape is correct.
- Forgetting the eyebrow when trying to show emotion.
- Using highlights that are too random or inconsistent.
These mistakes are very common, so do not let them discourage you. Every artist makes them while learning. The more you simplify and practice the structure, the faster your eyes will improve.
Easy Practice Exercise for Better Anime Eyes
A great way to improve is to fill one sketchbook page with small eye studies. Draw the same base eye over and over, but change one thing each time. Try a different iris size, eyebrow angle, lash thickness, or highlight shape. This kind of focused repetition trains your hand much faster than drawing one perfect eye for an hour.
You can also create a mini reference chart for yourself. Make sections for cute eyes, sharp eyes, sleepy eyes, happy eyes, and sad eyes. Over time, you will build your own visual library and develop a personal style.
Final Thoughts on How to Draw Anime Eyes
Learning how to draw anime eyes gets easier when you stop thinking of them as complicated details and start seeing them as simple layered shapes. Begin with the top and bottom lines, add a large iris, place the pupil, leave room for highlights, and use the eyebrow to guide the emotion. That simple process can take you a long way.
The best part is that anime eyes offer so much room for creativity. You can keep them soft and minimal or make them bold and dramatic. As you practice, you will notice which shapes and details match the characters you love to draw most.
Keep sketching, keep experimenting, and do not worry about making them perfect right away. Strong anime eyes come from repetition, observation, and small improvements over time. The more you practice, the more expressive and confident your drawings will become.